You send a photo to the lab, it comes back, and half of someone’s head is gone. Or the whole thing prints with thin white bars down the sides like it wandered in from 1998. Almost every time, the culprit is the same. The picture and the paper were never the same shape, and nobody checked the size first.
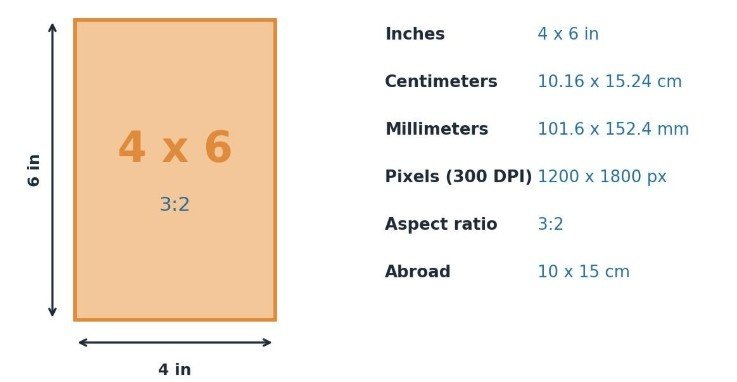
So let’s settle it. How big is a 4×6 photo? Four inches by six inches. In metric that is 10.16 by 15.24 cm, and in pixels it is 1200 by 1800 when you print at 300 DPI. It sits in a 3:2 shape, the same proportion the camera in your pocket almost certainly shoots.
That is the whole answer in three lines. The rest of this guide is everything that trips people up around those numbers: the units, the ratio, the pixels, the cropping, and how to walk away with a print that looks like what you actually saw.
The Short Answer, Every Unit
If you came here for numbers and nothing else, here they are. Screenshot this and move on with your day.
| Measurement | 4×6 Photo |
|---|---|
| Inches | 4 x 6 in |
| Centimeters | 10.16 x 15.24 cm |
| Millimeters | 101.6 x 152.4 mm |
| Pixels at 300 DPI | 1200 x 1800 px |
| Aspect ratio | 3:2 (also written 2:3) |
| International label | 10 x 15 cm |
One caveat before you go. Outside the US, the very same print is usually sold as 10 x 15 cm. It is a rounded label, a whisker smaller than the exact inch math, but it shares the 3:2 shape, so labs treat the two as the same order. More on that in a minute.
What “4×6” Actually Measures
The two numbers in 4×6 are the print’s dimensions in inches. Four inches on the short side, six inches on the long side. That is it. No hidden decimals, no fine print.
Convert that to metric and you get 10.16 cm by 15.24 cm, or 101.6 mm by 152.4 mm if you like your measurements small. In feet, for the one person who asked, it is about 0.33 by 0.5. The inch figures are exact because the format was defined in inches. The metric numbers are just that same size translated over.
You will also see the size written as 6×4. Same print, different orientation. 4×6 usually implies portrait, tall side up, while 6×4 implies landscape, wide. Plenty of labs use them interchangeably and rotate your image to fit however it was shot. If orientation matters to you, say so on the order, or crop it the way you want before uploading so nothing gets guessed for you.
Here is a thing worth knowing. A 4×6 is the physical paper size, not a pixel count. A file that is literally 4 by 6 pixels would be a speck you could barely see. When someone says a photo is 4×6, they mean it will print at 4 by 6 inches. How sharp it looks at that size is a separate question, and it comes down to how many pixels you packed into those inches. We will get to that.
One more piece of trivia that explains why 4×6 feels so standard. It was not always the default. For decades the common small print was 3.5 by 5 inches, sized to match the older 110 and 126 film formats and the early point-and-shoot era. When 35mm took over the amateur market and one-hour photo labs spread through every mall in the 1980s and 1990s, 4×6 edged out 3.5×5 because its 3:2 shape matched the 35mm negative with almost no cropping.
The lab could print your whole frame, waste less paper, and hand you something that looked like what you shot. 4×6 won on math, and it never gave the crown back.
The 10×15 cm Question: Is a 4×6 the Same Abroad?
Order prints in Berlin, Bangkok, or Buenos Aires and you probably will not see 4×6 on the menu. You will see 10×15. Those are centimeters, and for every practical purpose it is the same print.
Here is the small print. An exact 4×6 inch conversion is 10.16 by 15.24 cm. The 10×15 cm print rounds that down by a millimeter or two on each side. The shape stays 3:2, so your image crops the same way, and no normal human eye will clock the difference on paper. Labs, frame makers, and album sleeves all treat 4×6 and 10×15 as one size.
Worth clearing up a common mix-up. 10×15 is not part of the ISO A-series paper standard. A6 paper, which sounds like it should be close, is 105 by 148 mm and sits at a 1:1.41 ratio, a different shape entirely. Photo prints never followed the A-series.
They kept the old photographic proportions built around 35mm film, which is exactly why 4×6 and 10×15 share that 3:2 look. So if you are shipping prints overseas or ordering from a foreign lab, ask for 10×15 and you will get your 4×6. The only thing that changes is the label on the box.
Why a 4×6 Is Shaped the Way It Is
The 4×6 did not come from a committee. Its shape traces back to a workaround from the 1910s, and once you know the story you will never forget the ratio.
Oskar Barnack, an engineer at the German optics firm that became Leica, wanted a small, portable camera stabilizer. Sitting around were rolls of 35mm movie film, cheap and everywhere at the time. Movie cameras ran that film vertically and exposed a little frame of roughly 18 by 24 mm. Barnack turned the film sideways and doubled the frame to 36 by 24 mm, giving himself a bigger negative and better quality.
That rectangle works out to a 3:2 ratio, and it stuck for the next hundred years. You can read the longer version in the camera aspect ratio archives. Photographers on forums like DPReview still argue about whether Barnack sweated over the ratio or just wanted the width of two movie frames. Best guess from the people closest to the history: he wanted two frames, and the ratio came along for the ride.
Fast forward. When digital cameras arrived, most makers kept that same 3:2 proportion for their sensors. Pick up a Canon R5, a Nikon Z8, a Sony A7, or a Fujifilm X-T5 and your files come out 3:2 by default. Because a 4×6 print is also 3:2, a full-frame or APS-C shot drops onto the paper with almost no cropping. That is the whole reason 4×6 became the cheap, universal, default print. The shape of your photo and the shape of the paper finally agreed.
Aspect Ratio, Explained Without the Headache
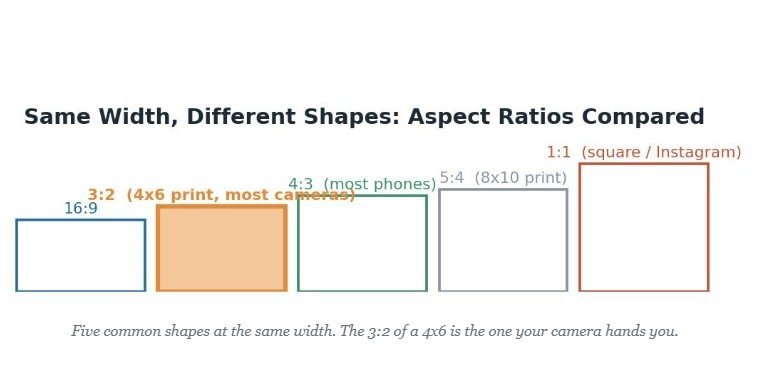
Aspect ratio is just the shape of your photo. It is the width compared to the height, boiled down to the simplest pair of numbers. A 4×6 is 3:2, which means for every 3 units of width there are 2 units of height. Flip it for a tall shot and it is 2:3. Same shape, different orientation. You can fix a stretched camera line while capturing.
Why should you care? Because shape is what decides how much of your picture survives when it meets a print or a screen of a different shape. Line up the common ones and the differences jump out:
- 3:2 is your camera and your 4×6 print. The easy match.
- 4:3 is what most phones shoot by default, and it is a touch boxier than 3:2.
- 1:1 is the square, made famous by early Instagram.
- 16:9 is the wide, cinematic shape you see on TVs and video.
- 5:4 is the chunkier shape behind an 8×10 print.
When two shapes do not match, one of two things happens. Either the photo gets cropped to fit, or it gets boxed in with blank strips. Neither is a disaster if you plan for it. The trouble only starts when a machine makes the choice for you. Knowing your ratios means you are the one deciding what stays in the frame.
Pixels, DPI, and Whether Your Print Looks Sharp
Inches tell you how big the paper is. Pixels tell you whether the picture on that paper looks crisp or like a wet newspaper. Two different jobs, and this is where most home prints fall apart.
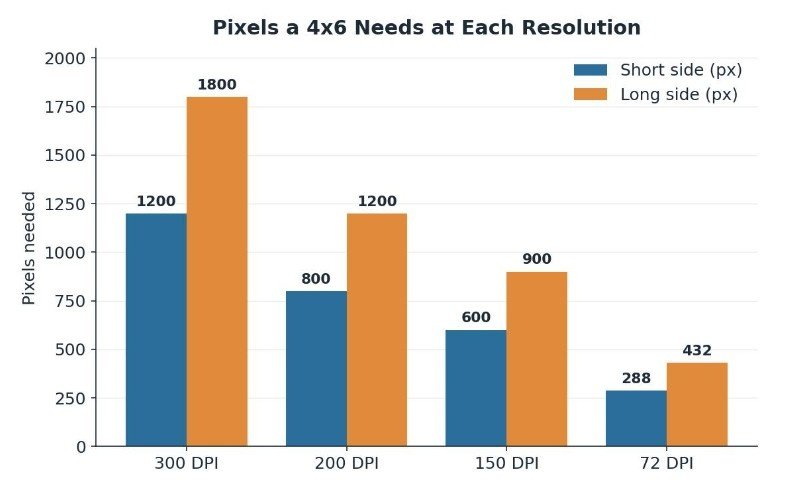
Print resolution gets measured in DPI, dots per inch, though you will also hear PPI, pixels per inch, used for the digital side. For photos, 300 is the magic number. Adobe points to 300 PPI as the standard for great print material, which lines up with the 300 DPI a printer wants for a clean finish. To hit that on a 4×6, you multiply the inches by 300. Four times 300 is 1200. Six times 300 is 1800. So a sharp 4×6 wants 1200 by 1800 pixels.
Drop below that and detail starts to soften. At 150 DPI the edges get fuzzy up close. At 72 DPI, the old screen resolution, a 4×6 would print as a blocky 288 by 432 pixels and look like a thumbnail blown up on a projector.
Now the myth that costs people the most grief. Changing the DPI number in your export box does not add detail. If your file has 288 by 432 real pixels and you type 300 into the resolution field, you still have 288 by 432 pixels. The software just relabels them. Real sharpness comes from real pixels, and you have to capture those up front. There is no slider that invents them after the fact.
How Many Megapixels Do You Really Need?
Here is the good news buried under all that math. A 4×6 barely asks anything of your camera.
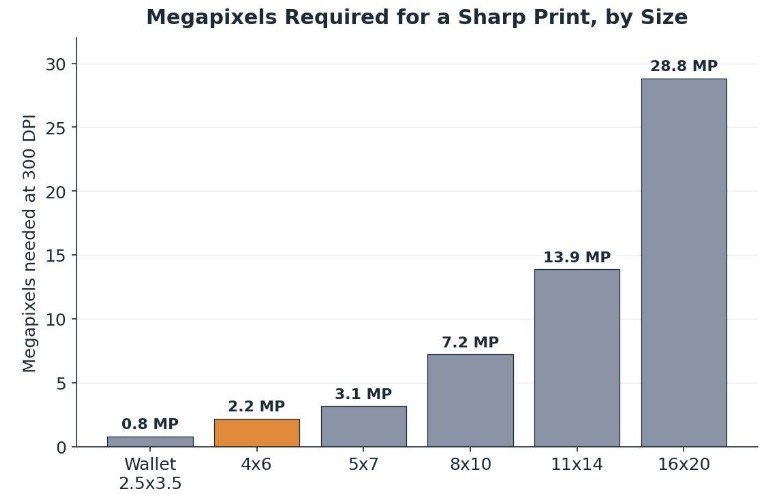
Do the pixels. 1200 by 1800 is 2,160,000 pixels, which rounds to about 2.2 megapixels. That is nothing. Any phone made in the last decade shoots 12 megapixels or more, and plenty now push 48 or higher. Even a photo yanked off social media can clear the 2.2 MP bar, though heavy compression will rob you of some crispness, so start from the original file when you can. If you want to see how far your megapixels stretch across bigger prints, Nature TTL has a clear breakdown with a size chart.
The megapixel question only gets serious as prints get bigger. An 8×10 at 300 DPI needs about 7.2 megapixels. An 11×14 needs closer to 14. A 16×20 wall print wants nearly 29. Those are the sizes where an old phone or a heavily cropped shot starts to struggle. For a humble 4×6, you are almost always swimming in more pixels than you need.
Viewing Distance Changes Everything
There is one more twist that print shops love and beginners never hear. How far away you stand changes how many pixels you actually need.
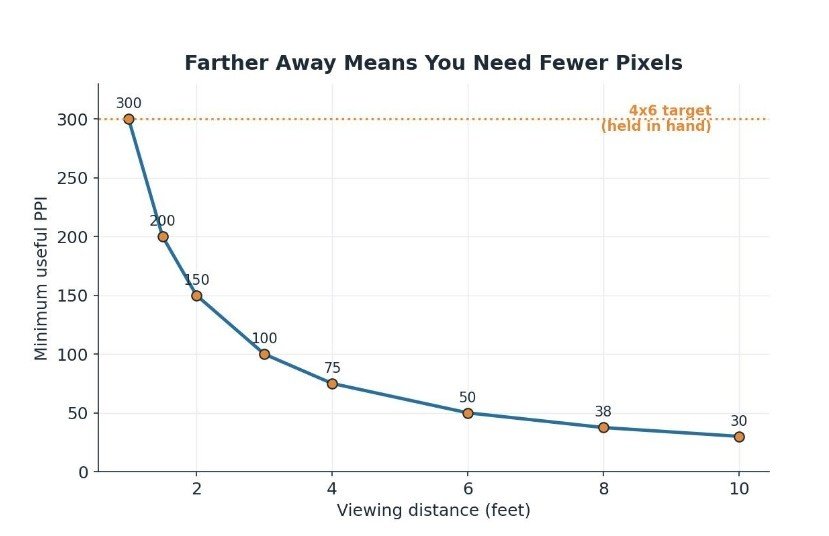
Your eye can only resolve so much detail at a given distance. A 4×6 gets held in your hand, maybe ten inches from your face, so it needs the full 300 PPI to look sharp under that kind of scrutiny. A billboard, on the other hand, might print at 20 PPI and look perfect, because you are viewing it from across a parking lot.
A rough rule floated by print pros: the minimum useful PPI is around 300 divided by the viewing distance in feet. Hold something a foot away and you want 300. Hang it on a wall you view from six feet and 50 PPI can look sharp. This is why people over-spec big prints and burn file size chasing 300 PPI on a canvas nobody will press their nose against. For a 4×6, though, assume close inspection and aim high.
How 4×6 Compares to 5×7, 8×10, and Bigger
A 4×6 is the baseline everyone measures against. Seeing it next to the sizes you will actually pick between makes the trade-offs obvious.
| Size | Inches | Aspect ratio | Best for |
|---|---|---|---|
| Wallet | 2.5 x 3.5 | 5:7 | Purses, gifts, school photos |
| 4×6 | 4 x 6 | 3:2 | Everyday prints, albums, the default |
| 5×7 | 5 x 7 | 5:7 | Framed desk photos, greeting cards |
| 8×10 | 8 x 10 | 4:5 | Portraits, wall frames |
| 8×12 | 8 x 12 | 3:2 | A 4×6 enlarged with zero cropping |
| 11×14 | 11 x 14 | 11:14 | Statement wall prints |
| 16×20 | 16 x 20 | 4:5 | Large wall art |
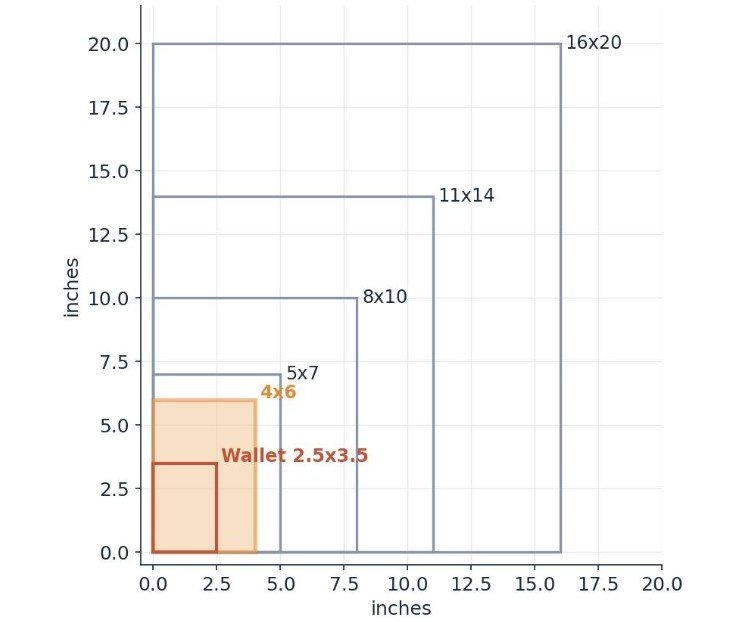
Two things to watch. First, the ratio column, because that is what bites. A 4×6 is 3:2. A 5×7 is close to 5:7. An 8×10 is 4:5. The moment you jump from 4×6 up to 8×10, the shape changes and your image has to surrender some edge to fit. Size up without checking and Grandma’s elbow walks right out of the frame.
Second, the one clean upgrade: 8×12. An 8×12 is also 3:2, the exact same shape as a 4×6, just doubled. So you can enlarge a 4×6 composition to 8×12 with zero cropping. If you love a shot at 4×6 and want it bigger without recomposing, 8×12 is the size that plays nice.
The Cropping Trap Nobody Warns You About
Your phone is usually the reason a 4×6 print surprises you. Most phones shoot 4:3 by default. A 4×6 print is 3:2. Those two shapes are close but not the same, so something has to give.
When the lab squeezes your 4:3 photo into a 3:2 print, it fills the frame and trims the overflow, which works out to roughly 11 percent of the long dimension, split top and bottom. Usually that is harmless. Sometimes it lops off the top of a head or the bottom of a sign. You did not choose it. An auto-cropper did.
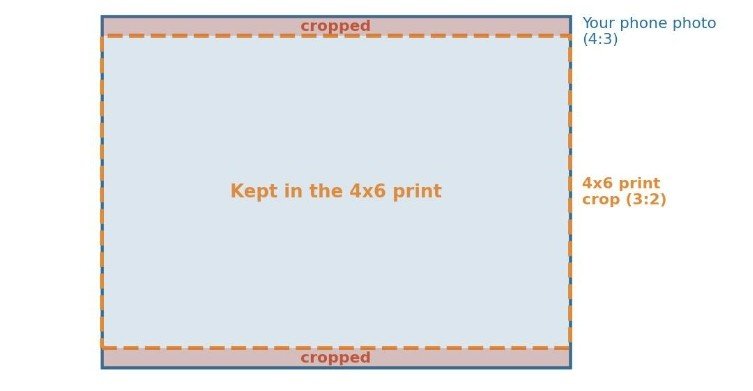
The fix is simple and it puts you back in charge. Crop to 3:2 yourself before you upload. On most phones you switch the camera to 3:2 in the settings, or crop after the fact in the photo editor to a 3:2 frame. Keep the important stuff away from the very edges so a small trim never costs you anything you cared about. For portraits especially, leave a little air above the head. That one habit kills the accidental-haircut problem for good.
Crop to 3:2 in Under a Minute
You do not need editing software to take control of the crop. Here is the fast path on the two devices you already own.
On a phone, open the photo, tap Edit, then the crop tool. Look for the aspect ratio option, usually a little grid or ratio icon, and choose 3:2. Drag the frame so the important stuff sits safely inside, then save a copy. Done.
On a computer, almost any editor works, from the built-in Photos app to Lightroom to a free tool like GIMP. Grab the crop tool, set the ratio to 3:2, position the box, and export. Give the file a new name so your original stays untouched. Now when you upload for a 4×6, the lab has nothing left to trim, and the print matches your screen.
How to Print a 4×6 Without the Headaches
Home printer or lab order, the workflow is the same five moves:
- Start with the highest-resolution copy you have. Not the texted version, not the social download. The original.
- Crop to 3:2 first, before anything else touches the file. You frame it, not the machine.
- Aim for 1200 by 1800 pixels or more. That is your 300 DPI target.
- On a home printer, use photo paper, not copy paper. Glossy makes color pop, matte kills glare. Choose based on where the print will live and how much light hits it.
- Keep an untouched original so you can reprint or recrop later without starting from a compressed copy.
A quick word for anyone shooting motion. Plenty of favorite frames these days start life inside a video rig, pulled from cinematic footage rather than snapped as a still. If you shoot aerials and you are weighing a drone against a cable cam for those sweeping shots, that decision is its own deep topic, and figuring out how big is 4×6 photo becomes the next question the second you grab a frame and want it on paper. Check that your grabbed still holds at least 1200 by 1800 pixels before you send it, because video frame grabs often carry fewer pixels than the footage looks like it should.
Printing at Home Versus Ordering From a Lab
For a 4×6, both routes work, and the right one depends on how many you print and how fussy you are about color.
Printing at home wins on speed and control. You get the print in your hands in minutes, you can reprint on the spot if the color looks off, and you tweak as you go. The catch is cost and consistency. Photo ink and quality paper are not cheap per sheet, and matching what you see on screen to what lands on paper takes some trial and error, since your monitor and your printer rarely agree out of the box on the first try.
A lab wins on price and polish when you print in volume. Drugstore and online labs turn out 4×6 prints for pennies each, on calibrated machines that hold color steady across a whole batch. You give up the instant turnaround, and you trust their auto-correction unless you turn it off, which is worth doing if you already edited the shot yourself. For a shoebox of vacation photos, a lab is almost always the cheaper, cleaner call. For a single print you want right now, fire up the home printer.
Framing and Displaying a 4×6
Once it is printed, a 4×6 is one of the easiest sizes to live with, which is half its appeal.
Frames are everywhere and cheap because 4×6 is the default. You will find them in every drugstore, craft store, and big-box aisle, so you are never hunting for an oddball size. Standard photo albums and sleeve pages are built around 4×6 too, which is why a stack of vacation prints slots right in without trimming.
Want a 4×6 to feel bigger on a wall? Mat it. Drop a 4×6 print inside a mat with a 4×6 opening and frame the whole thing at 8×10 or larger. The mat border does the heavy lifting and the small print suddenly looks intentional and gallery-ready. It is the cheapest upgrade in the whole hobby. For a shelf or desk, a plain 4×6 frame propped at eye level does the job with zero fuss.
Using a 4×6 Shape on Screens and Social
The 4×6 is a print size, but its 3:2 shape shows up on screens all the time, and it does not always play nice with social platforms.
On the web, a 1200 by 1800 pixel image, the same file that prints a sharp 4×6, looks great on phones and laptops. For screens, only the pixel dimensions matter; the DPI tag does nothing, because browsers render by pixels and ignore it. So the same file serves double duty, print and web, with no change.
Social platforms are pickier. Instagram leans toward 1:1 squares and 4:5 portraits, and stories and reels want tall 9:16. Your 3:2 shot will get cropped or boxed to fit those slots. If a photo is destined for both a 4×6 print and an Instagram post, keep your subject near the center so it survives whichever crop each platform applies. Shoot a touch wider than you need and you leave yourself room to crop for every shape later, print and feed alike.
Common 4×6 Mistakes and Quick Fixes
Most bad 4×6 prints come from the same short list of slip-ups:
- Printing a 4:3 phone shot without cropping, then wondering why the top got clipped. Crop to 3:2 first.
- Trusting the DPI field to fix a low-resolution file. It cannot. Start with enough pixels.
- Printing straight from a messaging app or a social download. Both compress hard. Pull the original.
- Filling the frame edge to edge with faces or text, so a small auto-crop cuts into them. Leave breathing room.
- Using plain paper at home and blaming the printer. Photo paper is the difference between a snapshot and a keepsake.
Frequently Asked Questions
1. Is 6×4 the same as 4×6?
Yes. Same print, same 3:2 shape. 4×6 usually means portrait and 6×4 means landscape, but many labs use the terms interchangeably and rotate to fit your image.
2. Is a 4×6 the same as 10×15 cm?
For all practical purposes, yes. An exact 4×6 is 10.16 by 15.24 cm, and 10×15 rounds that off by a millimeter or two. Same shape, treated as the same order worldwide.
3. How many pixels do I need for a sharp 4×6?
1200 by 1800 pixels, which is 300 DPI. That is only about 2.2 megapixels, so almost any modern phone has plenty to spare.
4. Can I enlarge a 4×6 to a bigger print without cropping?
Enlarge it to 8×12 and you crop nothing, because 8×12 shares the exact 3:2 shape. Jump to 8×10 or 5×7 and you will lose a little edge, since those are different shapes.
5. Can I print 4×6 photos on regular paper at home?
You can, but do not expect much. Regular paper is fine for a rough draft. Photo paper holds color and detail far better and is worth the small extra cost for anything you want to keep.
6. Glossy or matte for a 4×6?
Glossy makes colors pop and looks punchy, but it shows fingerprints and glare. Matte is calmer and easier to view in bright rooms. Pick based on where the print will sit and how much light hits it.
7. Why does my 4×6 print have white borders?
Two usual causes. Either the printer is set to add a border instead of printing borderless, or your image is a different shape than 3:2, so the lab padded it with white to avoid cropping. Turn on borderless printing, and crop to 3:2 first, and the bars disappear.
8. What DPI should I export at for a 4×6?
Export at 300 DPI with pixel dimensions of at least 1200 by 1800. If your editor asks for a resolution and a size, set the size to 4 by 6 inches and the resolution to 300, and confirm it is not throwing away pixels to get there.
9. Is a 4×6 good enough for a photography portfolio?
For handouts, client previews, and proof prints, absolutely. A crisp 4×6 shows a photo cleanly and travels well. For wall pieces and gallery work you will want larger sizes, but plenty of pros use 4×6 prints as the quick, cheap way to review and share a shoot.
The Takeaway
So, how big is a 4×6 photo? Four by six inches, 10.16 by 15.24 cm, 1200 by 1800 pixels at 300 DPI, in a 3:2 shape that matches the camera already in your pocket. Get those numbers right and the gap between a keeper and a cropped letdown comes down to two habits: crop to 3:2, and start with enough pixels. Everything else in this guide is detail hanging off those two moves.
What is the photo you keep meaning to print and never do? Grab the original, crop it to 3:2, order the 4×6, and put it somewhere you will actually see it. Then come back and tell me how it turned out.