What’s the minimum rigging safety setup for mounting a camera overhead?

Home » What’s the minimum rigging safety setup for mounting a camera overhead?

I need to mount a camera overhead for a static shot — not a huge rig, just a camera and cage on a grid or pipe mount. What’s the actual minimum safety setup, since I can’t find clear documentation on safety cables for smaller rigs?

4 Editorial Answers

These answers are written and fact-checked by PhotoShipOne's editorial team to represent genuinely different perspectives — they are not user comments or crowd-sourced discussion.

Editorial Perspective

Grip / Rigging Standard

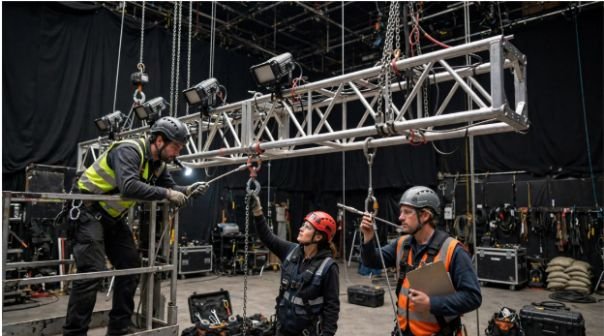
The rule experienced grips apply regardless of rig size: one point of attachment is never enough. Whatever your primary mount is — a clamp, a baseplate, a quick-release — add a secondary safety cable or rated safety wire rated for the full weight of the package, independently anchored, so that if the primary mount fails, the camera doesn't fall. This applies even to a "small" camera-and-cage setup; small rigs still injure people or damage gear when they drop from height, and most reported incidents involve people assuming a lightweight rig didn't need the same discipline as a heavy one.

Concretely, for a basic overhead grid/pipe mount: rated pipe clamp or grid clamp → safety cable looped through the camera cage's rated attachment point (not just around the lens or a handle) → back to the grid independently of the clamp.

Editorial Perspective

Beginner / Low-Budget Setup

You don't need expensive gear to do this correctly. A rated steel safety cable with carabiner ends (climbing or rigging-rated, not decorative) costs $15–$30 and is the single highest-value safety purchase for anyone doing overhead mounts on a budget. Thread it through your camera cage's dedicated mounting point and an independent structural point on the grid or pipe — not through the clamp you're already trusting for the primary hold, since that defeats the point of redundancy.

If you're unsure whether a specific clamp or mount is weight-rated for your camera package, check the manufacturer's spec sheet before the shoot day, not during setup under time pressure.

Editorial Perspective

Risk / What Goes Wrong

Most overhead rigging incidents reported by working grips trace back to the same small set of assumptions: a single quarter-inch thread holding a monitor or accessory that works loose mid-shoot, a clamp used past its rated weight because "it looked fine," or a rig built once and never re-inspected across a multi-day shoot. None of these require a complex rig to go wrong — they happen on simple overhead mounts precisely because people under-rig the "easy" setups.

Build a habit of a pre-shot visual check every time the rig is moved or re-leveled, not just on initial setup — vibration and repeated adjustment are what loosen fasteners over a shoot day.

Editorial Perspective

Documentation / Process

Beyond the physical setup, write down (even briefly) what you rigged, with what hardware, and its rated capacity — a one-line rigging safety note, not a full safety plan, if the shoot is small. This matters because overhead rigging is one of the few grip tasks where "it worked last time" isn't a safety argument: different grid spacing, different pipe diameter, or a heavier lens on the same camera body all change the load picture. A rigging safety plan scales down to a simple checklist for small setups; it doesn't need to disappear just because the rig is small.

partners@mybacklinks.co

http://photoshipone.com

Leave a Reply

Your email address will not be published. Required fields are marked *